Candle Fragrance Oil Guide
By Nadia Colbert, candle maker since 2014 · Updated
Scent is the reason most people make candles, and it is also the part that goes wrong most often. A candle that smells wonderful in the pitcher can smell like nothing at all once it is lit. The causes are almost always the same handful: fragrance percentage, the temperature the oil went in at, cure time, and the size of the melt pool. This guide takes each in turn and gives you a way to test rather than guess.
In this guide
Fragrance load explained — what a percentage actually means, with the math.
Fragrance oil versus essential oil — the comparison table.
The two oils in the Waxwright kit — lemon, vanilla, and what is published.
When to add fragrance — flash point, stirring, and pour temperature.
Fixing a weak scent throw — the four checks, in order.
Fragrance Load Explained
The calculation is simple once you see it done. Take the wax weight for your batch, multiply by the percentage you want, and that is your oil weight. Eight ounces of wax at 8 percent needs 0.64 ounces of fragrance oil. Ten ounces at 6 percent needs 0.6 ounces. Percentages in this craft are almost always by weight rather than by volume, so a small kitchen scale that reads in tenths of an ounce or in grams is the tool that makes the whole thing reliable.
Two mistakes come out of misreading the percentage. The first is calculating the oil as a share of the total finished candle rather than of the wax, which produces a slightly weaker candle than intended. The difference is small, and either convention works as long as you stay consistent across batches so your notes remain comparable. The second is assuming that more oil always means more scent. Every wax has a saturation limit, and past that limit the excess does not bind. It pools at the surface, sits in the melt pool as a separate layer, and can affect how the flame behaves.
Working below the maximum is a reasonable default. A candle at a moderate load with a full melt pool usually outperforms a candle stuffed with oil that never melts to the edge, because scent release depends on the surface area of liquid wax more than on raw concentration. That relationship is why wick choice and fragrance are the same conversation, and the melt pool logic is worked through in the candle wick size guide.
Fragrance Oil Versus Essential Oil
The distinction matters, because the two products are not substitutes despite sitting on adjacent shelves. A fragrance oil is a formulated blend designed around a target scent and around thermal stability. That formulation is exactly why it survives being stirred into wax at temperature and then vaporized off a melt pool for hours. An essential oil is a single plant extract, prized for its own qualities, and not engineered for this job at all.
| Property | Fragrance oil | Essential oil |
|---|---|---|
| Origin | Blended, may include natural and synthetic aroma materials | Distilled or pressed from plant matter |
| Heat stability | Formulated for candle temperatures | Varies widely, many are volatile |
| Scent range | Very wide, including scents with no natural source | Limited to what plants provide |
| Consistency between batches | High | Varies with harvest and origin |
| Cost per ounce | Generally lower | Generally higher, sometimes far higher |
| Typical use in kits | Standard | Occasional, usually as a premium option |
This comparison reflects the general conventions of candle making rather than a test of specific bottles. Any oil you buy should come with its own guidance, and that guidance outranks a general table.
Citrus is the classic illustration of the difference. Citrus essential oils are famously fugitive, meaning the bright top note that makes them appealing burns off fast. Candle makers who want a lemon scent that survives a three hour burn generally reach for a fragrance oil formulated for the purpose. Vanilla runs into a different problem, since true vanilla extract is not a candle material at all, and the warm vanilla scent people expect from a candle comes from fragrance blending.
The Two Oils in the Waxwright Kit
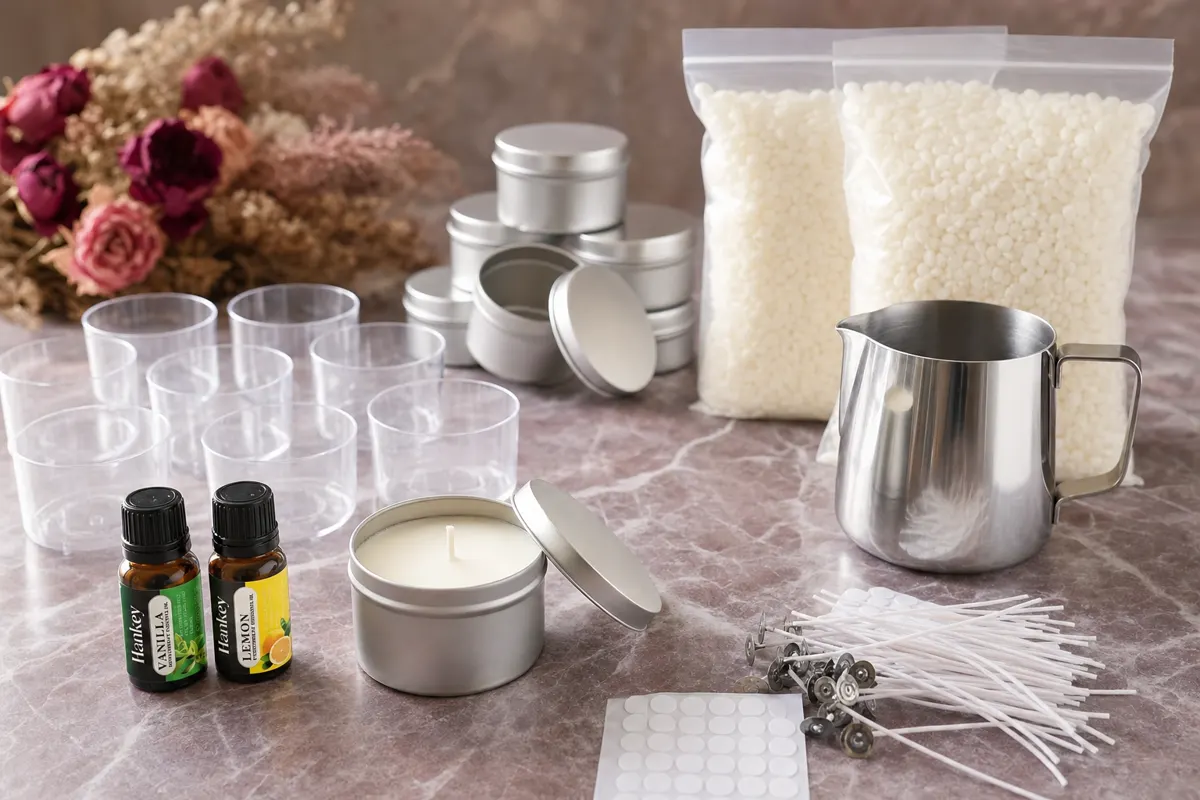
The full contents of the candle making kit are one stainless steel melting pitcher, two bags of soy wax, 50 candle wicks plus 20 extra wicks, four candle tins with lids, ten plastic candle jars, two fragrance oils in lemon and vanilla, four color dyes, two wooden centering devices, one stainless steel spoon, 56 glue dots, and a user manual. The box measures 8.46 x 5 x 4.9 inches, or 21.5 x 12.7 x 12.5 cm.
Lemon and vanilla is a sensible pair for a first kit, and not only because both are widely liked. They sit at opposite ends of the scent spectrum, one bright and sharp, the other warm and sweet, so pouring both teaches you more than pouring two variations on the same theme. They also blend into each other pleasantly if you decide to experiment, which gives a third option out of two bottles.
Fourteen containers come in the box, four tins at 2.36 x 1.57 inches and ten plastic jars at 1.54 inches in diameter by 0.98 inches tall. That is enough vessels to run a genuine comparison. Pour a few at a modest fragrance addition and a few with more, cure them side by side, and burn them a week apart. Since the wax bags carry no printed weight, weigh what you melt so your notes stay meaningful, using the water test described in the wick guide to size each batch.
The stainless steel spoon in the kit matters here more than it looks. Stirring fragrance thoroughly into melted wax is what binds it, and a metal spoon lets you stir for a full minute or two without absorbing scent the way wood does. Verified buyer data for 2026 puts the kit at 4.9 out of 5 across 105 four and five star reviews with over 900 units sold, and buyer notes on scent are collected on the reviews page.
When to Add Fragrance
Flash point is the term you will meet on fragrance oil documentation. It is the temperature at which the vapor above a liquid can ignite in the presence of a flame, and it is primarily a shipping and storage classification rather than a candle making instruction. Makers use it as a rough ceiling anyway, on the reasonable logic that wax hot enough to approach an oil's flash point is hot enough to be losing scent to evaporation.
The habit that works is to let the wax cool noticeably from its melt before the oil goes in. You are aiming for wax that is still comfortably liquid and clear, not wax that is starting to cloud at the edges. Cloudiness means crystals are forming, and oil added at that stage will not distribute evenly. Somewhere between fully melted and starting to set is a wide target, which is why this step is easier in practice than it sounds in writing.
Stirring is the underrated half. Fragrance oil and wax are not naturally inclined to mix, and a quick swirl leaves pockets of unbound oil that later show up as surface seepage or as a candle that smells strong cold and weak lit. Slow, steady stirring for a minute or two, scraping the sides and base of the pitcher, is what produces an even candle. Fast whipping is worse than slow stirring because it beats air into the wax and leaves bubbles in the set surface.
Pour temperature is a separate decision from fragrance temperature, and soy in particular rewards pouring on the cooler side of the workable range for a smoother top. The full sequence from melting to setting is laid out in how to make soy candles, and the behavior of each wax family is compared in the candle wax types guide.
Fixing a Weak Scent Throw
Candle makers separate cold throw from hot throw. Cold throw is what the candle smells like unlit, sitting on a shelf. Hot throw is what it fills a room with while burning. They are only loosely related, and a candle can be quietly impressive at one and disappointing at the other. Hot throw is the one that matters, and it is the one worth judging.
Start with cure time, since it is the one check that asks nothing of your recipe. A soy candle burned the day it was poured will almost always underperform the same candle burned a week later, since fragrance is still binding into the wax as it crystallizes. Give a candle several days at minimum, longer if you can wait, before you conclude anything about it. More recipes have been ruined by impatience than by bad ingredients.
Then look at the melt pool. Scent leaves a candle from the surface of the liquid wax, so a narrow pool releases proportionally less no matter how much oil is in the wax. If the candle tunnels and leaves a rim of solid wax at the wall, the fix is the wick or the container, not the fragrance. That diagnosis is the whole subject of the candle wick size guide, and it is the single most common misdiagnosis in the craft.
Only after those two should you raise the fragrance load, and then by a small step rather than a leap, staying within what the wax can hold. Finally, revisit your temperatures. If the oil went into very hot wax, part of it was lost before the candle ever set, and simply repeating the batch at a cooler stirring temperature can make a visible difference at the same percentage.
One last variable is the room itself. A large open plan space asks far more of a single small candle than a bedroom does, and the containers in this kit are modest in size. Two or three candles placed around a room will do what one cannot, which is another argument for a kit that gives you fourteen vessels to work with rather than a single trial pour. That quantity also makes it a workable group project, covered on the candle making kit for adults page.
The tools that support all of this are listed on the candle making supplies page, soy specific guidance sits on the soy candle making kit page, and the start to finish walkthrough is in how to make candles at home. The kit itself is $49.95, down from $69.95, with free shipping, delivery in 6 to 10 business days, and a 30 day guarantee.