How to Make Soy Candles
By Nadia Colbert, candle maker since 2014 · Updated
Soy is the wax most people learn on, and it rewards a slightly different technique than the paraffin candles that shaped the old advice. It melts gently, it contracts as it sets, and it needs time before it smells like anything. Work with those three habits instead of against them and soy is the easiest container wax there is.
In this guide
Why soy wax for candles. This section explains what soy actually does differently in a container.
What you need for a soy pour. Here is the full contents list and what each piece is for.
Melting and pour temperature. Soy is sensitive to how hot it gets and how fast it cools.
Wicking a soy candle. Container width drives this decision more than wax type does.
Why soy needs a cure. Scent throw is mostly a question of patience.
Frosting, wet spots, and other soy quirks. Some of these are flaws and some of them simply are not.
Why Soy Wax for Candles
The practical case for soy in a beginner kit comes down to forgiveness. It liquefies over a hot water bath without any special equipment, it does not demand aggressive heat, and cleanup after a session is genuinely simple. Compare that to a harder wax that needs more heat to move and more effort to clean, and you can see why almost every starter kit on the market, including the Waxwright candle making kit, ships with soy.
Softness is the trade. Soy will not hold its own shape as a freestanding pillar, so it belongs in a tin or a jar. It also shrinks as it hardens, which is why sinkholes around the wick are the classic soy beginner complaint rather than a sign that anything went wrong. Understand that contraction is coming and you can plan for it instead of being surprised by it.
| Behavior | Soy wax | Harder waxes |
|---|---|---|
| Best format | Containers, tins, jars | Containers and freestanding pillars |
| Melting | Gentle, over a water bath | Needs more heat to move |
| Contraction on cooling | Noticeable, sinkholes are common | Less pronounced |
| Cure before lighting | Wanted, and it changes the scent | Less critical |
| Cleanup | Hot water and dish soap | Usually more work |
A wax-by-wax breakdown, including beeswax and coconut blends, sits in the candle wax types guide.
What You Need for a Soy Pour
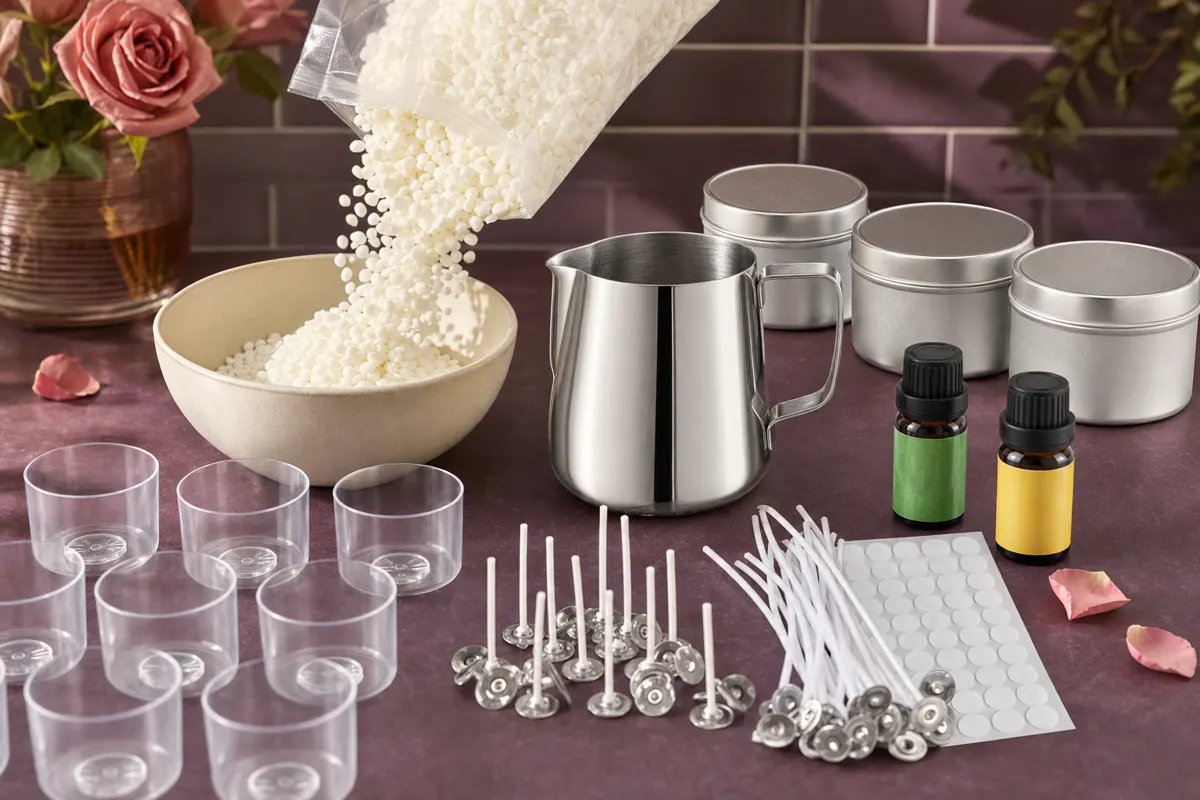
The soy candle making kit arrives with one stainless steel melting pitcher, two bags of soy wax, fifty candle wicks plus twenty extra wicks, four candle tins with lids, ten plastic candle jars, two fragrance oils in lemon and vanilla, four color dyes, two wooden centering devices, one stainless steel spoon, fifty-six glue dots, and a user manual. Nothing else is required to finish a candle.
Two details in that list are worth pausing on. The first is the wick count. Seventy wicks against fourteen containers is a deliberate surplus, and it means you can pull a wick that is not working, remelt, and repour without feeling like you wasted anything. The second is the pitcher, which measures 3.74 inches wide and 4.21 inches tall (9.5 cm by 10.7 cm) and sits inside a saucepan of water so the wax never touches a burner.
The containers are small, and small is an advantage with soy. The metal tins are 2.36 inches across and 1.57 inches tall (6 cm by 4 cm), and the plastic jars are 1.54 inches across and 0.98 inches tall (3.9 cm by 2.5 cm). A narrow container reaches a full edge-to-edge melt pool quickly, and a full melt pool is what keeps soy from tunneling. Every component is listed piece by piece on the candle making supplies page, and the whole box measures 8.46 by 5 by 4.9 inches (21.5 by 12.7 by 12.5 cm).
Melting and Pour Temperature
Container soy waxes are commonly described as melting somewhere in the 115 to 135°F range (46 to 57°C), and different blends land in different places within it. Your kit ships with a user manual, and the figure printed there for your particular wax is the one that matters. Treat the general range as orientation rather than instruction.
Overheating is the mistake with real consequences. Soy that has been driven far past what it needed can scorch, and scorched wax carries a faint burnt note that competes with whatever fragrance you add afterward. The hot water bath protects you from that almost automatically, because water sets a ceiling on how hot the pitcher can get. This is the same reason experienced makers keep using a double boiler long after they could get away with something faster.
Pour temperature is the second lever. A pour made while the wax is still extremely hot tends to cool unevenly and pull away from the container walls, and a pour made when the wax has already turned cloudy sets with a lumpy surface. The window between the two is wide and easy to hit: wait a few minutes after taking the pitcher off the heat, stir, then pour while the liquid still looks clear and moves freely. Cool the finished candles slowly on a flat surface with no draft, no window, and no refrigerator.
Wicking a Soy Candle
Soy is more sensitive to wick choice than harder waxes, and the reason is its low melt point. A wick that runs slightly small will still produce a flame, but it will not generate a melt pool wide enough to reach the container walls, and soy remembers. The ring of wax left behind on the first burn is the ring that gets left behind on every burn after it.
The counterweight is that both containers in this kit are narrow, which puts you in the most forgiving part of the range. Where wicking gets genuinely difficult is in wide vessels, where a single wick has to melt a large surface and often cannot. The full reasoning, plus what changes when you move to bigger jars, is in the candle wick size guide.
Practical sequence: wick and glue the containers before you melt anything, because chasing wick tabs with a pitcher of hot wax in your other hand is how surfaces get ruined. With only two centering devices in the box, you work in pairs, pouring two containers at a time and moving the devices along once the wax has set enough to hold the wick on its own. That rhythm also gives you a natural checkpoint after the first two candles.
Why Soy Needs a Cure
This is the single most common reason a first soy candle disappoints. Everything went right, the surface looks clean, the wick is centered, and the room smells of nothing. The instinct is to blame the fragrance oil, and the actual cause is usually that the candle was three hours old. Cure it and the same candle behaves differently.
How you stir also decides how much the cure can do for you. Take the pitcher off the heat, let it cool slightly, add fragrance oil and dye, then stir slowly and steadily for a full two minutes. Slow matters, because splashing folds air into the wax and air produces a pitted surface. Two minutes matters, because oil and wax will separate quietly if you let them. What happens next in the jar is covered in the candle fragrance oil guide.
When the cure is finished, the first burn sets the pattern. Light the candle and leave it burning until the melt pool reaches the edge of the container the whole way around. Blow it out before that and you have taught it to tunnel. This holds for every soy candle you will ever make, and it is the one rule I would keep if I had to throw the rest away.
Frosting, Wet Spots, and Other Soy Quirks
Frosting. Soy is a natural wax and it recrystallizes over time, especially with temperature swings. The white bloom on the surface is that process showing. Slow, even cooling reduces it, and storing candles somewhere with a stable temperature reduces it further. It never disappears entirely from natural soy, and among makers it reads as a marker of the wax rather than a defect.
Wet spots. These are contraction, the same shrinkage that causes sinkholes. As soy hardens it pulls slightly inward, and where it loses contact with the container wall you see a patch that looks damp. Pouring into containers at room temperature and cooling them slowly helps. The candle burns exactly the same either way.
Sinkholes. A cavity opens around the wick as the candle cools. The standard fix is a small second pour of reserved wax once the first has set, which is one more reason to melt in batches and keep some wax in the pitcher rather than emptying it.
Rough or lumpy tops. This means the wax was poured too cool, after it had started to cloud. Remelt and pour earlier next time. Soy is fully reworkable, which is the quiet advantage of the whole material: almost nothing you do to it is permanent.
The kit that all of this is written against is $49.95, down from $69.95, with free shipping in 6 to 10 business days and a 30 day guarantee. Buyer ratings show 4.9 out of 5 across 105 four and five star reviews with over 900 units sold, according to verified buyer data from 2026. Buyer comments are collected on the reviews page, the kit's contents are listed on how we test, and the general beginner walkthrough that covers wax types beyond soy is how to make candles at home. If this is going to be a project shared with other people, read the pacing notes on the candle making kit for adults page before you start.